
Overview
You will learn
- How to enhance customer details with its order information
- How to create a new page for displaying the order details


Prerequisites
Steps
Intro
You may clone an existing metadata project from the MDK Tutorial GitHub repository to start with this tutorial.
To enhance your MDK app with customer order information, you need to carry out the following tasks:
- Create a new order list page
- Create a new order details page
- Create a new navigation action to the new order details page
- Write a JavaScript logic to calculate total number of orders for a customer
- Display top 5 orders in customer details page
- Add a header control to the orders grid of the customer detail page to display a text label
- Add a footer control to the orders grid of customer detail page to show total order count

This page will display customer orders list, you will add an Object Table control that is used to display information (like Sales order ID, order creation date, gross amount and life cycle status name) about an object.
You can find more details about available controls in section page.
In your MDK project, right-click the Pages | MDK: New Page | select Section | Next.

New Section Page Creation Dialog You can find more details about section pages.
In the Base Information step, enter the page Name
Customers_Ordersand click Finish to complete the page creation process.
Customers Orders Page Name Entry Once the page opens in the page editor, click on the white area to select it’s Action Bar, and set the Caption to Customer Orders.

Action Bar Caption Set To Customer Orders Next, add an Object Table control to display information like sales order ID, order creation date, gross amount and life cycle status name.
In the Layout Editor, expand the Controls | Data Bound Container group, drag and drop the Object Table control onto the page area.

Object Table Control Drag And Drop In the Properties pane, provide the below information:
Property Value ServiceSelect com_sap_edm_sampleservice_v4.servicefrom the dropdownEntitySetSelect SalesOrderHeadersfrom the dropdownQueryOptions$filter=CustomerID eq {CustomerID}&$orderby=CreatedAt desc
Object Table Service And EntitySet Properties The query expression will filter the top five order entries for a given customer ID, returning them in descending order when sorted by the order creation date property.

Query Options Filter Expression Result Now, start binding Object Table properties with
SalesOrderHeadersentity set properties.In the Appearance section of the Properties pane, provide the below information:
Property Value DescriptionRemove the default value and leave it blank FootnoteRemove the default value and leave it blank PreserveIconStackSpacingfalseProgressIndicatorRemove the default value and leave it blank StatusText$(C,{GrossAmount},{CurrencyCode},'',{minimumIntegerDigits:1,minimumFractionDigits:0,maximumFractionDigits:2,useGrouping:true})Subheadbind it to {CustomerID}SubstatusTextRemove the default value and leave it blank TagsClick the item0and then click the trash icon to delete the default itemTitle$(D,{CreatedAt},'','',{format:'medium'})
Object Table Appearance Properties Bound $(C,{GrossAmount},{CurrencyCode},'',{minimumIntegerDigits:1,minimumFractionDigits:0,maximumFractionDigits:2,useGrouping:true})is an expression of how to format currency value, end result would be like €200.44. By default it will be formatted to the device’s locale setting. More details on Currency Formatter is available in documentation.
Currency Formatter Expression Preview $(D,{CreatedAt},'','',{format:'medium'})is an expression of how to format a date, end result would be like June 20, 2020. By default it will be formatted to the device’s locale setting. More details on Date Formatter is available in the documentation.
Date Formatter Expression Preview In the Search section of the Properties pane, change both the Search Enabled property and Barcode Scanner property to
true.
Search Enabled And Barcode Scanner True In the Behavior section of the Properties pane, select
DisclosureIndicatortoAccessoryTypeproperty.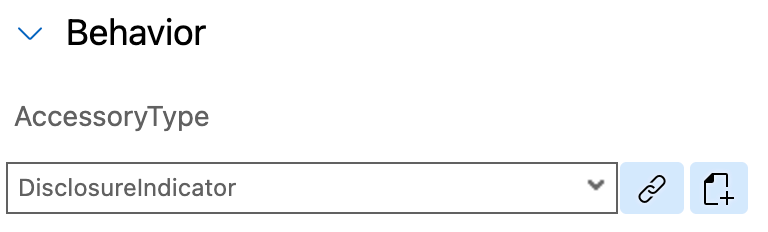
AccessoryType Set To DisclosureIndicator In the Avatar Grid section of the Properties pane, remove the default Avatar by selecting the
item0and then clicking the trash icon to delete the default item.
Avatar Grid Default Item Removed In the Avatar Stack section of the Properties pane, remove the default Avatar by selecting the
item0and then clicking the trash icon to delete the default item.
Avatar Stack Default Item Removed In the
EmptySectionof the Properties pane, provideNo Orders Foundfor the Caption property.
EmptySection Caption No Orders Found
This page will show related details for an order. In this page, you will add an Object Header control that is used to display information (like first name, last name, date of birth, email address & phone number) about the header of an object and Static Key Value control to display key value pair items like address, city, postal code & country.
In your MDK project, right-click the Pages | MDK: New Page | select Section | Next.
New Section Page Creation Dialog Enter the Page Name as
SalesOrders_Detailsand click Finish to complete the page creation process.
SalesOrders Details Page Name Entry In the Properties pane, provide the below information under
DesignTimeTarget.Property Value ServiceSelect com_sap_edm_sampleservice_v4.servicefrom the dropdownEntitySetselect SalesOrderHeadersfrom the dropdown
DesignTimeTarget Service EntitySet Configuration DesignTimeTargetis a page level property similar to Target but it is only used for design time. This helps in validating the binding context of current page. For more details, see documentation.Once the page opens in the page editor, click on the white area to select it’s Action Bar, and set the Caption to Order Details.

Action Bar Caption Set To Order Details Next, you will add a Static Key Value container and its item Key Value Item to display information like sales order id, life cycle status & date of order creation name.
Static Key Value is a container that can display one or more key value pair items on a section page. In this container, you can include a Key Value Item, a simple key value cell that displays a label and a text pair. You can find more details here about this container.
In the Layout Editor, expand the Controls | Static Container section, drag and drop the Static Key Value control onto the page area.

Static Key Value Control Added To Page Now, add key value item to this container. In the Layout Editor, expand the Controls | Static Items section, drag and drop the Key Value Item control onto the page area.

Key Value Item Control Added To Page Provide the below information:
Property Value KeyNameOrder NumberValuebind it to {SalesOrderID}
Order Number Key Value Item Binding Make sure to select values for the mentioned properties only from
SalesOrderHeaderentity. You may find similar values from other entities.Repeat the above step by adding 5 more Key Value Item on the page.

Five Additional Key Value Items Added Provide the below information:
Property Value KeyNameStatusValuebind it to {LifeCycleStatusName}Property Value KeyNameCreated AtValue$(D,{CreatedAt},'','',{format:'medium'})Property Value KeyNameNet AmountValue$(C,{NetAmount},{CurrencyCode},'',{minimumIntegerDigits:1,minimumFractionDigits:0,maximumFractionDigits:2,useGrouping:true})Property Value KeyNameTax AmountValue$(C,{TaxAmount},{CurrencyCode},'',{minimumIntegerDigits:1,minimumFractionDigits:0,maximumFractionDigits:2,useGrouping:true})Property Value KeyNameTotal AmountValue$(C,{GrossAmount},{CurrencyCode},'',{minimumIntegerDigits:1,minimumFractionDigits:0,maximumFractionDigits:2,useGrouping:true})You should have final binding for all key value items as below:

All Key Value Items Final Binding
When a user taps an order on the Customer Orders page, it should navigate to the related details page.
The MDK template generates some generic actions, such as GenericNavigation.action, that can be reused at many places in your project and can be overridden with specific information. Of course, you can also create a new action, as you have done in previous tutorials.
In the
Customers_Orders.page, select the Object Table control, navigate to the Events tab. Click the dotted icon for theOnPressproperty and select theObject Browser.
OnPress Event Object Browser Selection Select
GenericNavigation.actionand click OK.
GenericNavigation Action Selected The
OnPressevent has been bound to theGenericNavigation.action. You will now override its properties. Click the dotted icon for theOnPressproperty and selectOverrides.
OnPress Property Overrides Option In the Override Action Properties window, provide the below information and click OK to complete the action override process.
Field Value PageToOpenSelect SalesOrders_Details.pagefrom the dropdown
Override Action PageToOpen SalesOrders Details You can find more details about Override Action in documentation.
You will notice that the
Overridesoption under theOnPressevent is now highlighted, indicating that the bound action is overridden. You can also view the overridden details in the page code editor by right-clicking on theCustomers_Orders.pageand opening it with text Editor.
OnPress Overrides Option Highlighted
You will add an Object Table compound to display top 5 orders information in the
Customers_Detail.page.In the Layout Editor, expand the Controls | Data Bound Container group, drag and drop the Object Table control onto the page area.

Object Table Added To Customer Detail Page In the Properties pane, provide below information:
Field Value Serviceselect com_sap_edm_sampleservice_v4.servicefrom the dropdownEntitySetselect {@odata.readLink}/SalesOrdersfrom the dropdownQueryOptions$top=5&$orderby=CreatedAt desc
Customer Detail Object Table Properties The
odata.readLinkannotation contains the read URL of the entity or collection.SalesOrdersis a navigation property in Customer entity toSalesOrderHeaderentity. You can find this information in OData service metadata document.
OData Service Metadata Navigation Property QueryOptionsexpression will filter order entries returned in descending when sorted by the order creation date property.Now, start binding Object Table properties with
SalesOrderHeadersentity set properties.In the Appearance section of the Properties pane, provide the below information:
Field Value DescriptionRemove the default value and leave it blank FootnoteRemove the default value and leave it blank PreserveIconStackSpacingfalseProgressIndicatorRemove the default value and leave it blank StatusText$(C,{GrossAmount},{CurrencyCode},'',{minimumIntegerDigits:1,minimumFractionDigits:0,maximumFractionDigits:2,useGrouping:true})Subheadbind it to {CustomerID}SubstatusTextRemove the default value and leave it blank TagsClick the item0and then click the trash icon to delete the default itemTitle$(D,{CreatedAt},'','',{format:'medium'})
Object Table Appearance Properties Configured In the Behavior section of the Properties pane, select
DisclosureIndicatortoAccessoryTypeproperty.AccessoryType Set To DisclosureIndicator In the Avatar Grid section of the Properties pane, remove the default Avatar by selecting the
item0and then clicking the trash icon to delete the default item.Avatar Grid Default Item Removed In the Avatar Stack section of the Properties pane, remove the default Avatar by selecting the
item0and clicking the trash icon to delete the default item.Avatar Stack Default Item Removed In the
EmptySectionof the Properties pane, provideNo Customer Orders Foundto Caption property.
EmptySection Caption No Customer Orders Found You may also want to open
SalesOrders_Detail.pagewhen clicking on any order inCustomers_Detail.page. InCustomers_Detail.page, select the Object Table, click the dotted icon under the Events tab for theOnPressevent to open the Object Browser. SelectGenericNavigation.actionand click OK.
Customer Detail OnPress GenericNavigation Bound You will now override its properties. Click the dotted icon for the
OnPressproperty and selectOverrides.
OnPress Overrides Option Selected In the Override Action Properties window, provide the below information and click OK to complete the action override process.
Field Value PageToOpenSelect SalesOrders_Details.pagefrom the dropdown
Override Action PageToOpen SalesOrders Details
For orders grid area, you will add a header to display some text label in
Customers_Detail.page.In the Layout Editor, expand the Controls | Section Bar section, drag and drop the Header control above the order grid area.

Header Control Dragged Above Orders Grid Provide the below information:
Property Value CaptionCustomer Orders
Header Caption Set To Customer Orders You can find more details about Header control in documentation.
For orders grid area, you will also add a footer to display total count of orders for a customer.
In the Layout Editor, expand the Controls | Section Bar section, drag and drop the Footer control below the order grid area.

Footer Control Dragged Below Orders Grid To show a total count of orders for a customer, you will write a JavaScript logic for this calculation. Click
Create a ruleoption forAttributeLabelproperty of the Footer control.
Footer AttributeLabel Create Rule Option Keep the default selection for the Object Type as Rule and Folders path.

Rule Object Type Default Selection In the Base Information step, enter the Rule name as
Customers_OrderCount, and then click Finish to complete the rule creation process.
Customers OrderCount Rule Name Entry Copy and paste the following code.
JavaScript/** * Describe this function... * @param {IClientAPI} context */ export default function CustomerOrderCount(context) { // Retrieves the current customer's information from the context const currentCustomer = context.getPageProxy().binding['@odata.readLink']; // Counts the number of sales orders associated with the current customer. return context.count('/demosampleapp/Services/com_sap_edm_sampleservice_v4.service', currentCustomer + '/SalesOrders', '').then((count) => { return count; }); }Switch back to the
Customers_Detail.pageand provide the below information for other properties of the Footer control:Property Value CaptionSee AllFooterStyleSelect Attributefrom the dropdownAccessoryTypeSelect DisclosureIndicatorfrom the dropdown
Footer Control Properties Caption See All You can find more details about Footer control.
You may also want to open Customer Orders page when clicking See All to see a complete list of orders belong to a particular customer.
Navigate to the Events tab for the Footer control. Click the dotted icon for the
OnPressproperty and select theObject Browser. Bound it to theGenericNavigation.action.
Footer OnPress GenericNavigation Action Bound You will now override its properties. Click the dotted icon for the
OnPressproperty and selectOverrides.
Footer OnPress Overrides Option Selected In the Override Action Properties window, provide the below information and click OK to complete the action override process.
Field Value PageToOpenSelect Customers_Orders.pagefrom the dropdown
Override Action PageToOpen Customers Orders
You will now deploy the updated project to your MDK client.
Click the Deploy option in the editor’s header area, and then choose the deployment target as Mobile Services .

Tap Check for Updates in the user menu on the Main page, you will see a New Version Available pop-up, tap Now.

Android New Version Available Popup Click a customer record, you will see the Customer Orders area in customer detail page and also total count of orders.

Android Customer Detail With Orders Count If you see No Customer Orders Found message, try with other customer record.
Tapping on any order navigates to its details page.

Android Order Details Page Navigation Navigate back to Details page, tap See All, which navigates to the Customer Orders page.

Android Customer Detail See All Button 
Android Customer Orders List Page
Tap Check for Updates in the user menu on the Main page, you will see a New Version Available pop-up, tap Now.

iOS New Version Available Popup Tap Customers | click a customer record. You will see the Customer Orders area in customer detail page and also total count of orders.

iOS Customer Detail With Orders Count If you see No Customer Orders Found message, try with other customer record.
Tapping on any order navigates to its details page.

iOS Order Details Page Navigation Navigate back to Details page, tap See All, which navigates to the Customer Orders page.

iOS Customer Detail See All Button 
iOS Customer Orders List Page
Resources
Discussion
Share feedback on this tutorial or join the conversation in SAP Community.