
Overview
You will learn
- How to further simplify screens in SAP Screen Personas
- How to insert scripts into your SAP Screen Personas flavors


Prerequisites
Steps
Intro
The focus of this tutorial is on simplifying the main screen of transaction IW51 (Create Service Notification) so that it can be used on a tablet. Not only does this involve hiding unneeded fields, but also adding barcode scanning functionality to make it simpler for users to enter the relevant equipment number. By the end of this tutorial, you will have a completed mobile app for a tablet. The next tutorial will cover optimizing the app for tablet and mobile phone use by modifying the spacing and size of screen objects to best fit on each device.
In the previous tutorial, you created a new flavor that featured a simple dashboard for your users to access transaction IW51. You must now navigate to the main screen of the transaction to begin simplifying it. In order to do so, open your flavor and click the Create Notification button you created in the last tutorial.

You will then navigate to this screen:

This will be the basis of your app. To simplify this screen, you will hide the fields, tab strips, and other objects not needed by your users.
To begin, open the SAP Screen Personas flavor editor. The first step in simplifying this flavor is hiding the Action Box container on the right side of the screen. Select it and then click Hide.

Your flavor should now have empty space on the right and should look like this:

You also do not need the Notification container. Select the area around the fields to select the entire container, rather than the individual fields and labels, and click Hide again.

Your screen should now look like this:

Next, you will hide the entire tab strip. Before you can do that, however; you must remove some of the fields that you wish to keep.
Select the container with the Sold-To Party and contact information, then drag it out of the tab strip.
This container is nested. You will have to click on it several times to select it instead of the various objects in the tab strip.

Next, you will move the Functional Location and Equipment fields out of the tab strip, just like the previous container. Select the Functional Location and Equipment labels and fields and drag them next to the container your previously removed.
You can multi-select objects by pressing and holding
CTRLwhile clicking on them

Your users also require the Description field and long text box. They can be found in the Subject group box further down on the screen. Select the Description label, field, and long text box and drag them out of the tab strip. Place them next to the other screen objects removed from the tab strip.

The last group of required fields are Required Start, Malfunction Start, Required End, and Malfunction End. They can be found in the Execution group box. Select them and drag them out of the tab strip.

You are now ready to hide the rest of the tab strip. Click its top left corner to easily select the entire object and click Hide.

The next screen simplification involves hiding the top toolbar. Since your users will not need it, select it and click Hide.

Finally, since you are building this flavor for a tablet, your users do not require the transaction code field or the small Save and Cancel buttons. Select and hide them. The Save and Cancel buttons will be replaced with buttons meant for touch interaction after you rearrange the screen.

At this point, your screen should only contain the fields required for your app. While their placement may differ, based on where you placed them outside of the tab strip, your screen should look similar to this:

At this point, you are finished with hiding screen objects. You will now arrange the remaining objects so that they can more easily be used by someone on a tablet.
In order to make your app more user friendly, as well as more aesthetically pleasing, you will now tidy the screen by grouping the previously scattered fields together. To begin, select your the container with the Sold-To and contact information and move it to the left side of the screen. Using the control in the Home tab, ensure the container is still selected and give it the following coordinates: 25pt down and 10pt right.

Next, you will move the fields containing the relevant date information for the malfunction. Multi-select the Required Start label and fields and give them the following coordinates: 70pt down and 10pt right.

Similarly, multi-select the Required End label and fields. Give them the following coordinates: 80pt down and 10pt right.

Once the Required fields are in place. Multi-select the Malfunction Start label and fields and give them the coordinates, 95pt down and 10pt right.

Then multi-select the Malfunction End label and fields and give them the coordinates 105pt down and 10pt right.

With the date and time information in place, you will now put the Functional location and Equipment fields in position. Multi-select the Functional location and Equipment fields and labels and give them the coordinates 120pt down and 10pt right.

Lastly, you will put the description fields into place. Multi-select the Description label and short text field and give it the coordinates 25pt down and 575pt right. You will then place the long text field below, with the coordinates 34pt down and 575pt right. To finish up with the long text box, change its dimensions using the fields in the Home tab. It should be 456pt wide and 122pt tall.

With the fields in the proper position, you will now perform one last adjustment to the labels by making them left aligned. Multi-select all of the labels on screen and select Left Align using the text alignment tool in the Home tab.

You have now completed the bulk of the modifications for this flavor. It should look like the screen below:

To begin wrapping up this application, you will now add larger Save and Cancel buttons to your screen that are better suited for touch interaction.
You will begin by creating a Save button. To do so, click on Menu Items Button in the Insert tab.

This will open a pop-up where you can give the button a label and select its function. Enter Save as the label text and select Service Notification/Save as the Menu Item type. Click Done to create the button.

Now you are going to modify the button. First, to ensure that it is aligned with all of the labels, place it at the following coordinates: 5pt down and 10pt right. Then change its dimensions to 150pt wide and 15pt tall. Lastly, change its fill color to a light blue using the Fill & Icon button in the Home tab.

Next you are going to create your Cancel button. Just like the Save button, begin by clicking on Menu Items Button in the Insert tab. Set the label text as Cancel and the Menu Item type as Edit/Cancel. Click Done to insert the button.

Give your new Cancel button the same dimensions as the Save button: 150pt wide and 15pt tall. Place it at the following coordinates: 5pt down and 175pt right.

With all of the required functionality on the screen, your next step will be to give your users additional functionality to simplify service notification creation even further. This next step will give them access to a barcode scanner so that they do not need to manually enter the equipment number. SAP Screen Personas offers pre-defined barcode scanner buttons that can be added to any input field in the flavor editor and works out of the box, as the associated script is available and its relationship to the script button is established. For this tutorial, however, the barcode scanner button will be created manually as an example of how script buttons that are added in the flavor editor work with scripts created in the script editor. Once completed, your users will be able to press a button to open the scanner, use their device’s camera to scan the barcode, and then a script will populate the Equipment field. As this feature requires the use of a mobile device camera, it will not work when accessed on a desktop
To begin, you need to create a script button. To do so, navigate to the Insert tab and click Script Button.
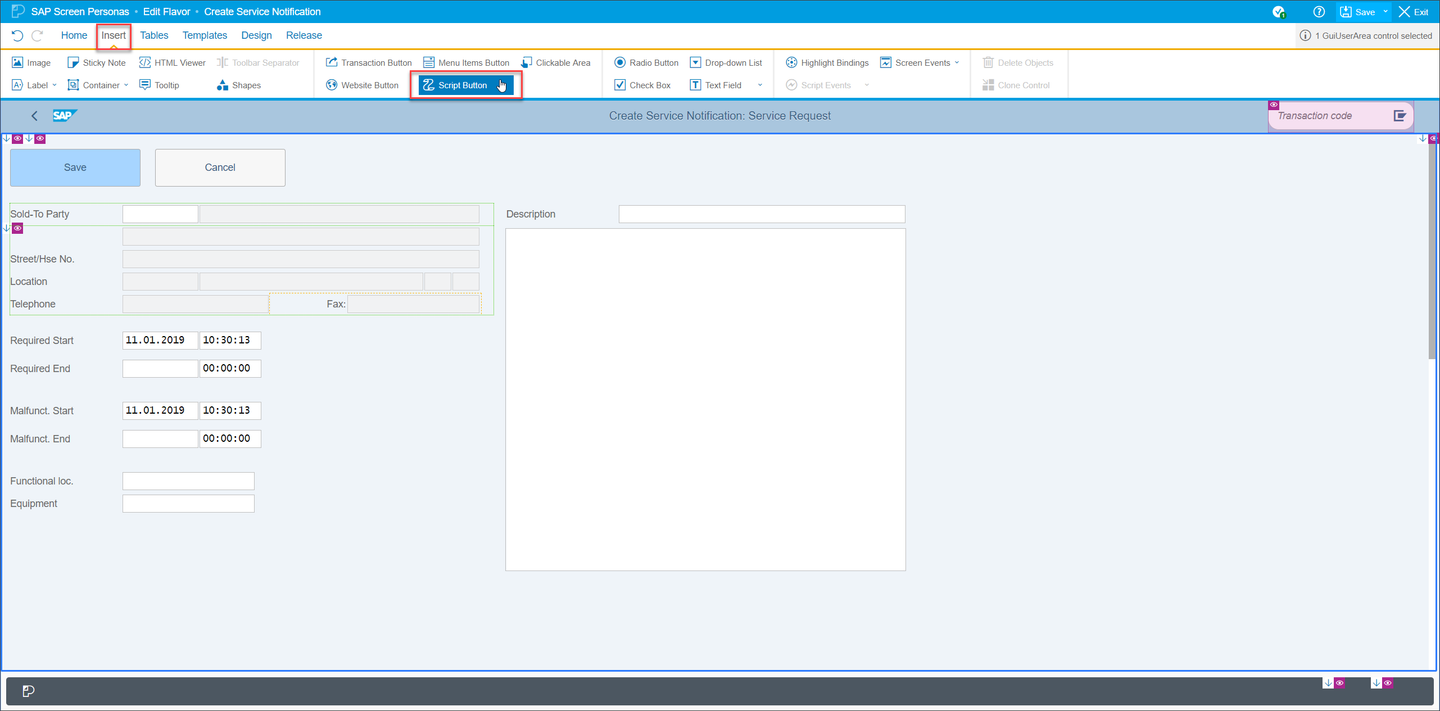
This will open a pop-up where you can enter the button label text. Enter Scan Equipment and click Done to insert the button.

Next, you will enlarge the button so that it is easily pressed and easily noticed. Give it the following dimensions: 278pt wide and 15pt tall. Place it underneath the Equipment field, at 141pt down and 10pt right.

Now that your button is in position, you will now create the first of the two required scripts for the barcode scanner. This first script will open and enable the scanner. To access the Script Editor, you must first Save your flavor and then Exit the flavor editor.

Next, open the Flavor Bar and press the Scripts button to open the Script Editor.

Now that you have opened the Script Editor, press the Create Script button.

Title the script openScanner and click the Confirm Creating New Script button to add the script to your flavor.

Next, paste the following JavaScript code into the script window:
// Callback functions for scanner
function scanSuccessCallback(result) {
                if (!result.cancelled) {
                                session.utils.put("scanvalue", result.text);
                                // This is called asynchronously, so the setText call is executed too late in Scripting Engine.
                                // It is already after ClientSideScriptEngine executing set property update for all the controls.
                                // So we use a 2nd script call to pick up async property update.
                                session.utils.executeScriptAsync("wnd[0]/scrptPersonas_UNIQUE_ID");
                } else {
                                session.utils.alert("Last scan cancelled");
                }
}

function scanErrorCallback(error) {
                session.utils.alert("Scanning failed");
}

if (cordova) {
	cordova.plugins.barcodeScanner.scan(scanSuccessCallback, scanErrorCallback);
} else {
	session.utils.alert("Native API access not supported");
}
Pay attention to the UNIQUE_ID placeholder in line 8. You will replace it with the script ID from your next script.
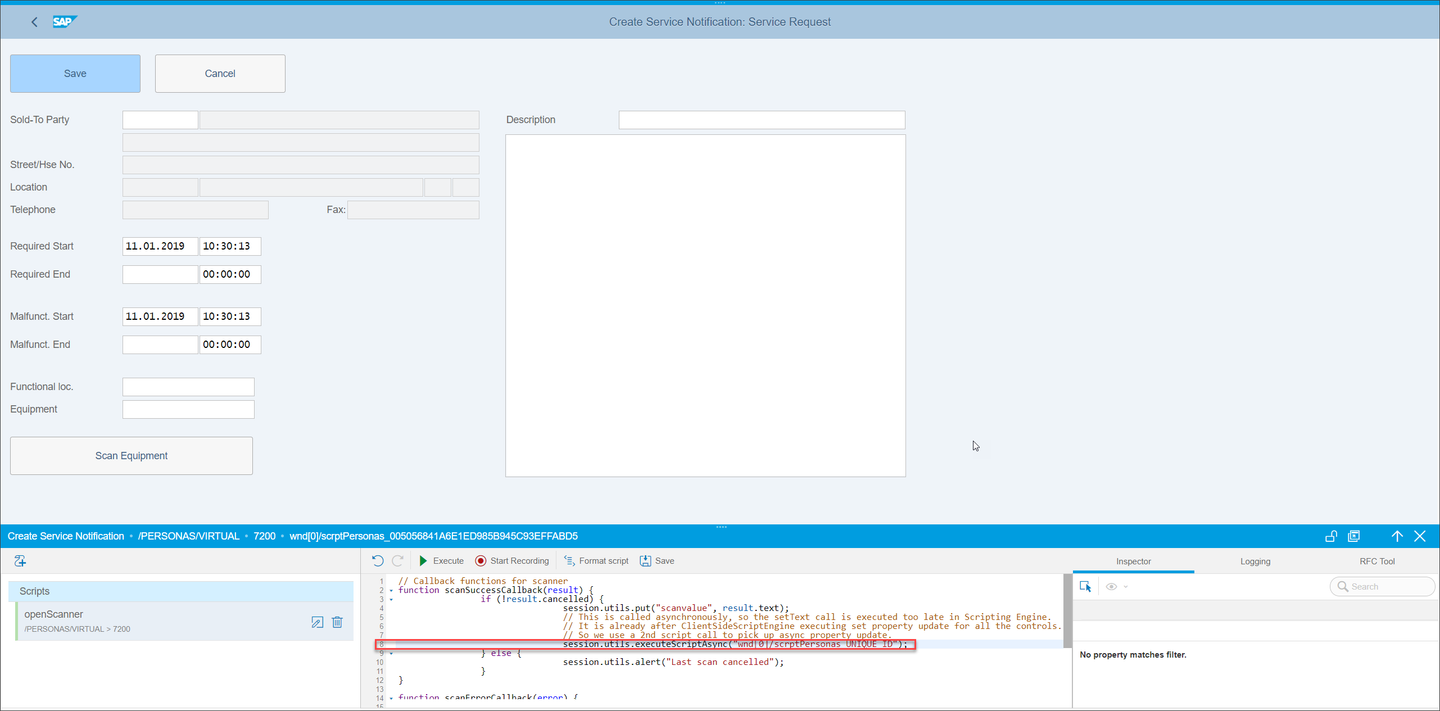
For now you will move on to create your next script, which will read the scanned value, write the equipment number into the Equipment field, and send that information to the backend.
Save the openScanner script and press the Create New Script button to create the next script. Name the next script writeBarcode. Then, paste the following JavaScript code into the script window:
var sText = session.utils.get("scanvalue");
session.findById("wnd[0]/usr/tabsTAB_GROUP_10/tabp10\\TAB01/ssubSUB_GROUP_10:SAPLIQS0:7235/subCUSTOM_SCREEN:SAPLIQS0:7212/subSUBSCREEN_2:SAPLIQS0:7322/subOBJEKT:SAPLIWO1:0100/ctxtRIWO1-EQUNR").text = sText;
session.activeWindow.sendVKey(0);
Next, save your writeBarcode script and copy your script ID, as illustrated below. You need to it complete your openScanner script.
CAUTION: Your script ID will differ from the one in this image.

To complete the openScanner script, open it by selecting it from the scripting window.

Now, delete the UNIQUE_ID placeholder in line 8 and replace it with your script ID from the writeBarcode script. Line 8 should now read like this: session.utils.executeScriptAsync("wnd[0]/scrptPersonas_005056841A6E1ED985B9A8C0E3532CB8");

Save your openScanner script and exit the script editor.

Your final step is to bind the openScanner script to the Scan Equipment button. Reopen the flavor editor and select the button. Navigate to the Insert tab, click Script Events, scroll down to onClick and select your openScanner script. It will now be triggered every time the user clicks the button.

Your initial application is now complete. In the next tutorial, you will optimize this flavor for use on tablets and mobile phones though the use of Adaptive Flavors – an SAP Screen Personas feature that allows you to create differently sized variations on your flavors.
Resources
Discussion
Share feedback on this tutorial or join the conversation in SAP Community.